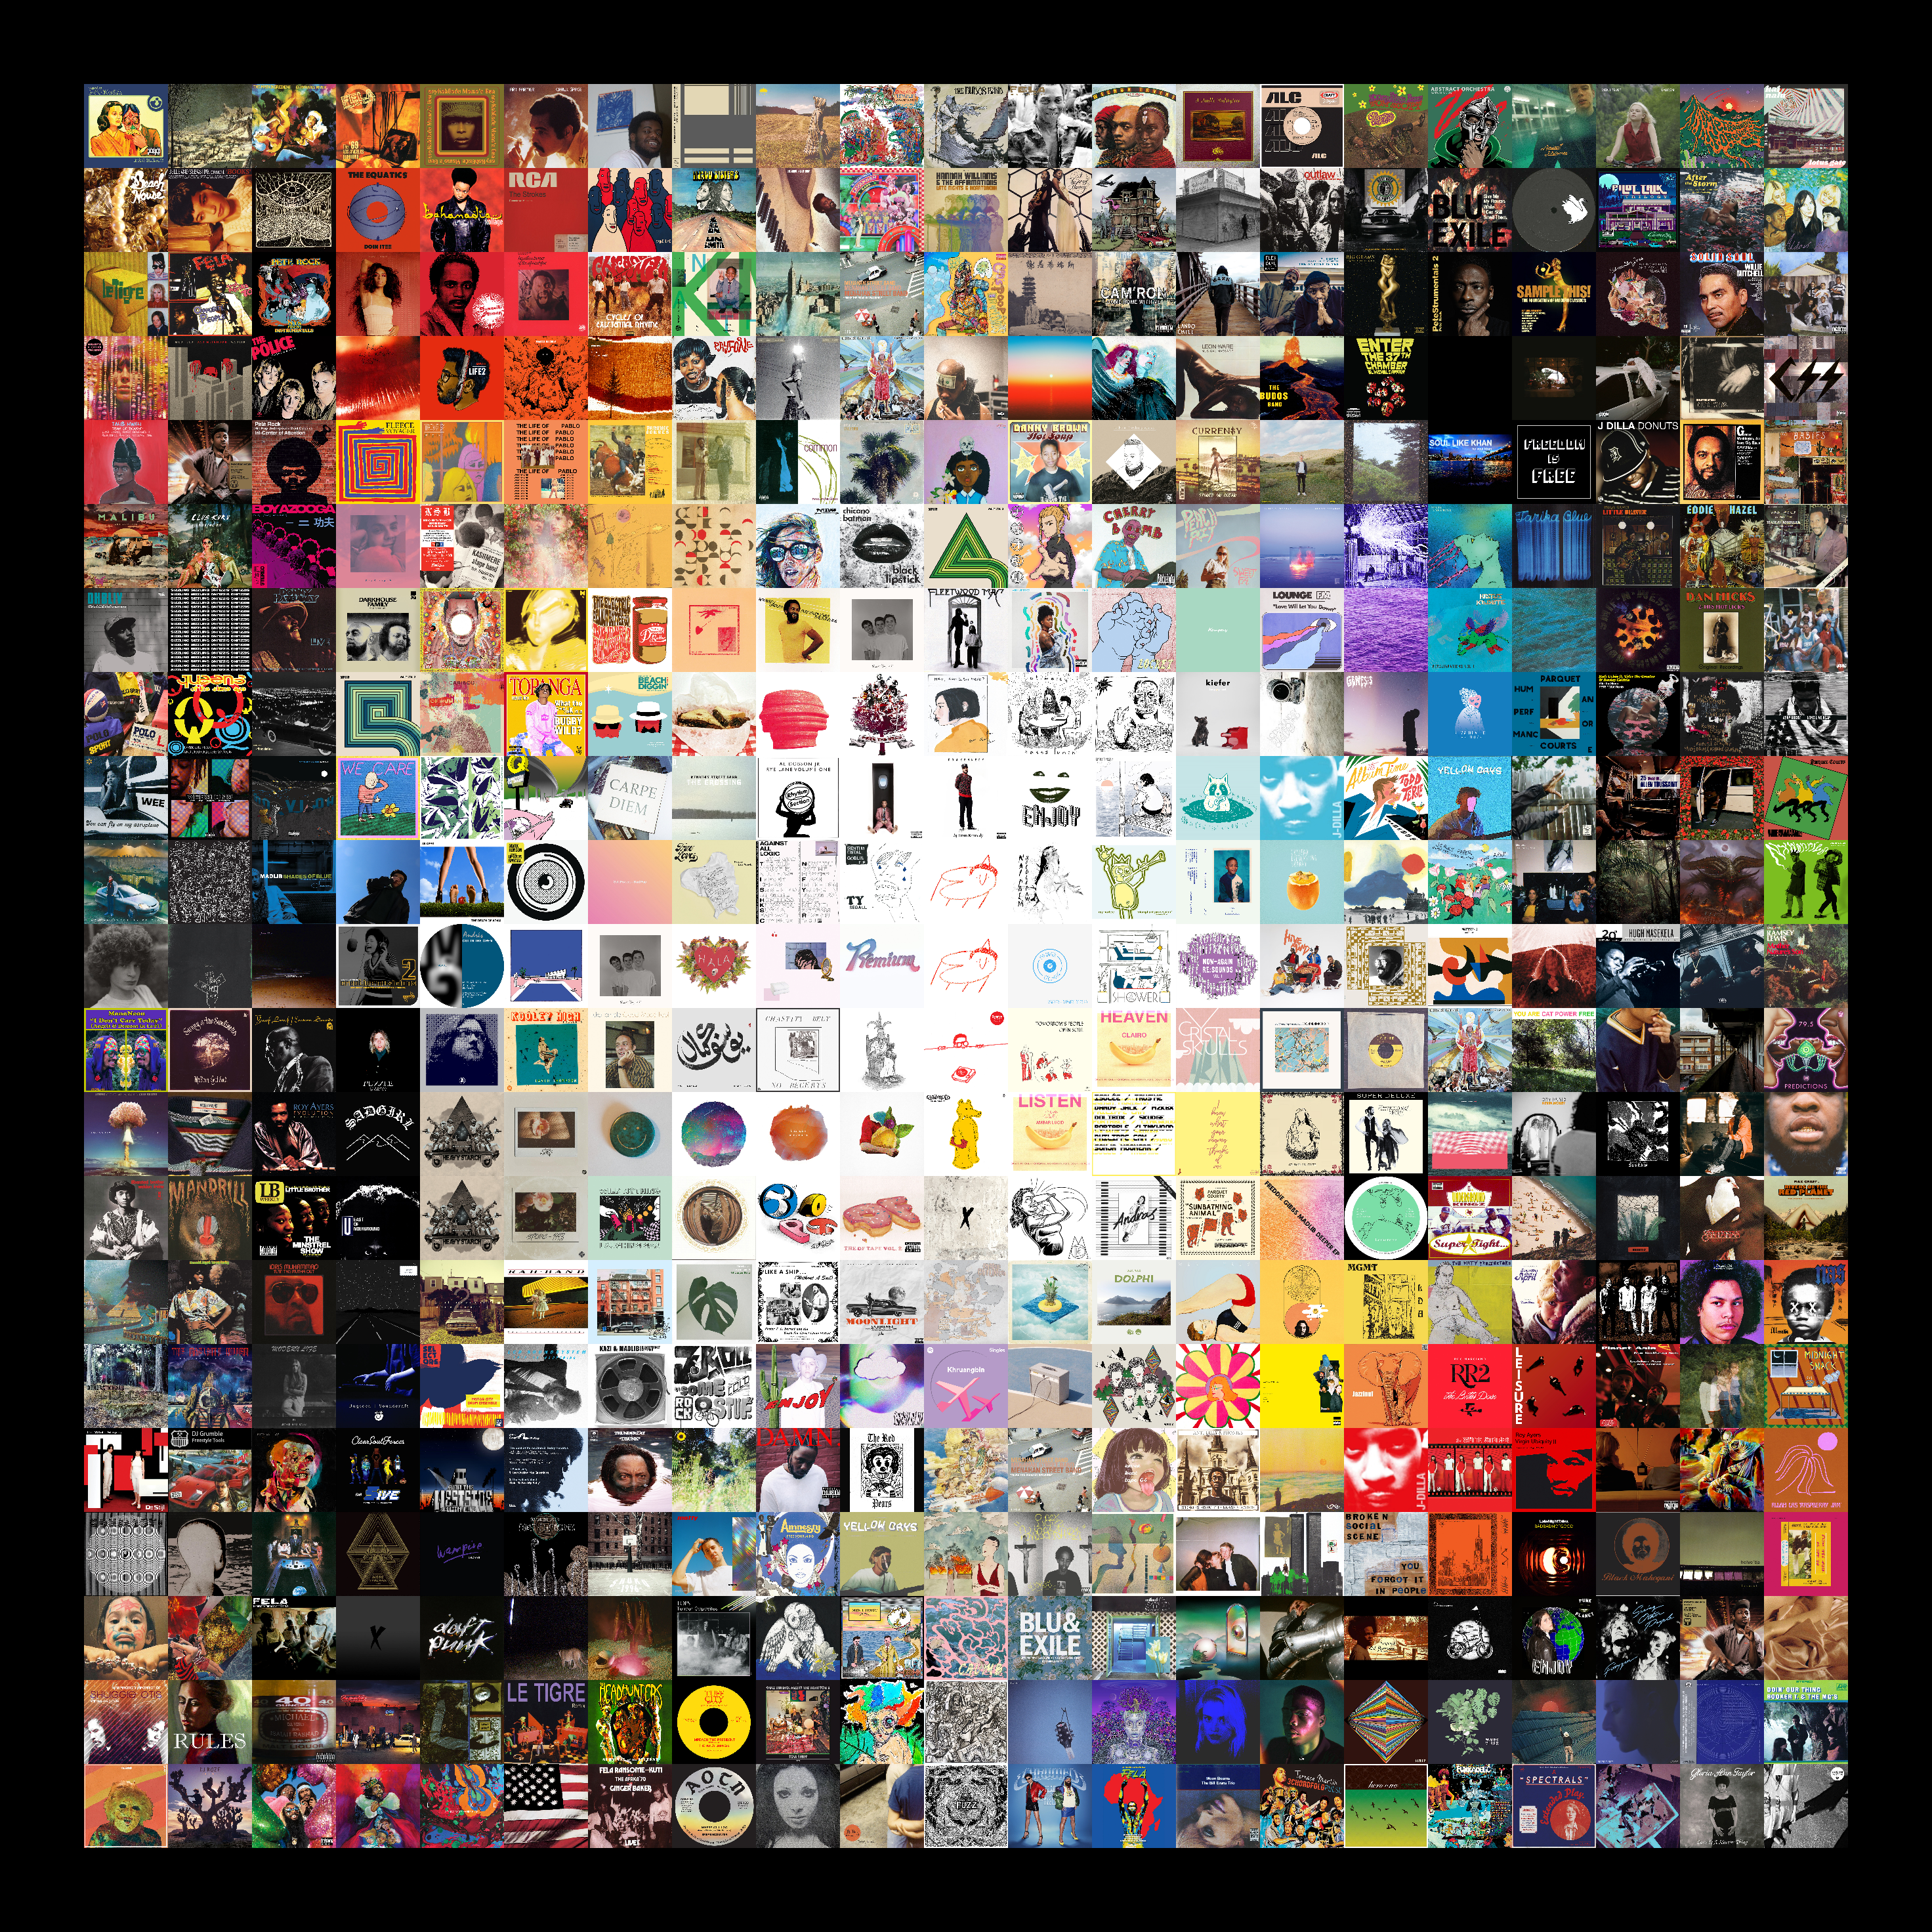
In this post, I'll be explaining how I created this collage of album art:
Getting the Album Art
As you might expect, I used the Spotify API to download the album art. I won't go through the code for this but if you know how to interact with an API, it's super straightforward. For this collage, I chose to use the album covers for the 100 songs in my "Top Songs of 2019" + the 100 songs I most recently added to my library.
Decomposing the Image Set
Now we'll want to perform PCA on all of the flattened images. For those who don't know, PCA is a method of projecting a dataset onto its "principal components". Here, principal components are defined as the axes in which the data varies the most. If we then choose to represent the data only using some of these principal components, then we have a more compact representation of how the data varies to use for comparing how similar two vectors in the space are. Here's a link to the Wikipedia if you want to learn the math behind it.
In our case, each vector in the space is an image. Therefore, when performing PCA, we will first be analyzing which pixels change the most across all the images. Then we will be using these pixels as a smaller vector representation of the image to use for fast comparison. This is a fairly naive approach since images change rapidly on a per-pixel basis. However, looking at the collage produced, it seems to work well enough (you can be the judge of that!). I would suspect that since many album covers (at least the ones in my library) are composed of a central object surrounded by a solid color, picking pixels from the background captures the varying color across images.
The Code
Without further ado, let's go over the code for this.
First, we'll load all of the images into a 2D array:
import os
from os.path import join
import numpy as np
from skimage.io import imread
from skimage.transform import resize

TILE_SIZE = 128
IMAGE_DIR = 'images'

tiles = []

for fname in os.listdir(IMAGE_DIR):
    tile = imread(join(img_dir, fname))
    tile = imresize(tile, (TILE_SIZE, TILE_SIZE)) # resize all the images to a uniform size
    tile = (255 * tile).astype(np.uint8).ravel()  # convert the image type back to bytes and flatten it
    tiles.append(tile)

tiles = np.array(tiles)
Now, we'll perform PCA on the dataset. For the collage at the beginning of the article, I used 10 components:
from sklearn.decomposition import PCA

NUM_COMP = 10
pca = PCA(NUM_COMP)

tiles_pca = pca.fit_transform(tiles)
pairwise_similarity = tiles_pca.dot(tiles_pca.T)

# Ignore self-similarity
n_tiles = len(tiles)
pairwise_similarity[np.arange(n_tiles), np.arange(n_tiles)] = 0
Here, we're using a nice vectorized trick to compute the pairwise similarity. tiles_pca will have shape (n_tiles, NUM_COMP) where each row is the PCA-projected vector for each image. Therefore, tiles_pca will have shape (NUM_COMP, n_tiles) and each column will have the vector for each image.
If we then multiply these two matrices together, each element in the result will be computed as:
(im1_comp1 im1_comp2 ... im1_comp10) * (im2_comp1    = (im1_comp1 * im2_comp1 + im1_comp2 * im2_comp2 + ... + im1_comp10 * im2_comp10)
                                        im2_comp2
                                        ...
                                        img2_comp10)
or the dot product between each image vector. This is equivalent to the unnormalized cosine similarity. So the metric will be biased towards image vector pairs with a large magnitude. Therefore, this metric should make the math nerds cringe but we don't care because it's functionally OK.
As a final step, we zero out the diagonal of the pairwise_similarity matrix. This is because the diagonal corresponds to the similarity between an image and itself. This will obviously be the highest of all similarities for this image, so we want to ignore it as to not make our collage look blocky.
Arranging the Tiles
Now that we have a pseudo-pairwise similarity between each tile, we need to use this to construct a collage with a nice color gradient.
To do this, we'll start from the center and build outwards like so:
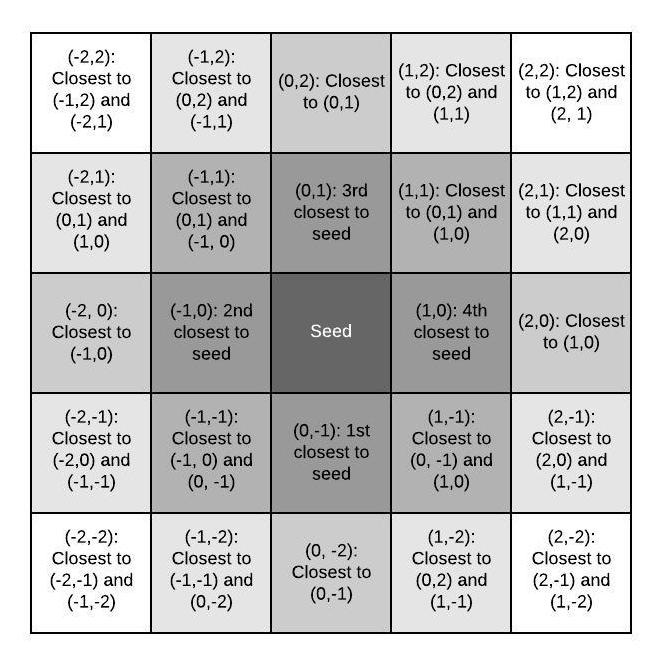
We start with a seed that is most similar to four other tiles. Then for each edge of the next shell out, start in the middle. picking the most similar tile to the corresponding shell in the inner shell. Then for each other tile in the outer shell, pick the tile most similar to its two existing neighbors (we're using a 4-connected scheme).
The Code
We start by creating a map of tile indices to positions in the collage:
n_img = int(np.ceil(np.sqrt(n_tiles)))

# We need an odd number of tiles to account for the seed
if n_img % 2 == 0:
    n_img += 1

ind_map = np.zeros((n_img, n_img), dtype=np.uint16)
and then pick a seed:
tot_similarity_to_neighbors = np.sort(pairwise_similarity, 0)[-4:].sum(0)
seed_ind = np.argmax(tot_similarity_to_neighbors)

# Clear the similarities to the seed and all other tiles
pairwise_similarity[np.arange(n_tiles), seed_ind] = 0

# Set the center index in the index map
c = n_img // 2
ind_map[c, c] = seed_ind+1
tot_similarity_to_neighbors is an array of the sum of similarties for each tile to its four closest neighbors. We then set the similarity of all other tiles to our seed to zero so we don't accidentally pick the seed again.
Notice that we're starting indices at one so we can use zero as a marker that an index hasn't yes been filled.
We'll then define a helper function to set a position (x, y) in the index map closest to (xs, ys):
def get_ind_at(ys, xs, y, x):
    target_inds = ind_map[ys, xs]

    # Bail if we haven't yet set the indices at ys and xs
    if (target_inds == 0).sum() > 0:
        return

    # Sum the similarity vectors for our two target indices
    similarities = pairwise_similarity[target_inds-1].sum(0)

    # Bail if we have already invalidated the indices
    if similarities.max() == 0:
        return

    # Get the most similar index
    chosen_ind = np.argsort(similarities)[-1] + 1
    ind_map[y, x] = chosen_ind

    # Invalidate the index chosen
    pairwise_similarity[np.arange(n_tiles), chosen_ind-1] = 0
We then build at most c shells as described before or until all of the indices in the map are valid:
l = 1

while l < c and (ind_map > 0).sum() < n_tiles:
    # Get the four indices radially out in the current shell
    get_ind_at([c-l+1], [c], c-l, c)
    get_ind_at([c+l-1], [c], c+l, c)
    get_ind_at([c], [c+l-1], c, c+l)
    get_ind_at([c], [c-l+1], c, c-l)

    # Build the top and bottom edges
    for dx in range(1, l):
        get_ind_at([c-l, c-l+1], [c+dx-1, c+dx], c-l, c+dx)
        get_ind_at([c-l, c-l+1], [c-dx+1, c-dx], c-l, c-dx)
        get_ind_at([c+l, c+l-1], [c+dx-1, c+dx], c+l, c+dx)
        get_ind_at([c+l, c+l-1], [c-dx+1, c-dx], c+l, c-dx)

    # Build the left and right edges
    for dy in range(1, l):
        get_ind_at([c+dy-1, c+dy], [c+l, c+l-1], c+dy, c+l)
        get_ind_at([c-dy+1, c-dy], [c+l, c+l-1], c-dy, c+l)
        get_ind_at([c+dy-1, c+dy], [c-l, c-l+1], c+dy, c-l)
        get_ind_at([c-dy+1, c-dy], [c-l, c-l+1], c-dy, c-l)

    # Get the indices at the corners
    get_ind_at([c-l, c-l+1], [c+l-1, c+l], c-l, c+l)
    get_ind_at([c+l, c+l-1], [c+l-1, c+l], c+l, c+l)
    get_ind_at([c+l, c+l-1], [c-l+1, c-l], c+l, c-l)
    get_ind_at([c-l, c-l+1], [c-l+1, c-l], c-l, c-l)

    l += 1
The final step is to take the index map and create the collage:
from skimage.io import imsave

collage = np.zeros((n_img * TILE_SIZE, n_img * TILE_SIZE, 3), dtype=np.uint8)

for i, row in enumerate(ind_map):
    for j, ind in enumerate(row):
        if ind == 0:
            continue

        collage[i*TILE_SIZE:(i+1)*TILE_SIZE, j*TILE_SIZE:(j+1)*TILE_SIZE] = tiles[ind-1].reshape(TILE_SIZE, TILE_SIZE, 3)

imsave('collage.png', collage)